
With continued use and general wear and tear, you will occasionally need to change the elements in your Dualit toaster.
There are different elements which fit the various models of Dualit toasters so please be sure to select the correct elements for your toaster - you can see the full range of Dualit toaster spares by clicking here.
When you have your replacement elements and you are ready to remove the old ones, follow our simple step-by-step guide below to get your toaster back up and running again.
Changing elements in a Dualit toaster
1. Firstly unplug the toaster and place it upside down on a soft cloth on your work top.
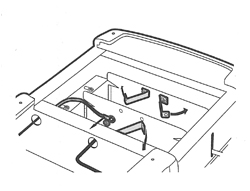
Remove the crumb tray and unscrew the feet to remove the base plate.
2. Loosen the locking nuts on the retaining plate using a 6.5mm spanner and then slide the retaining plate back.
3. Unscrew the brass links and wires.
4. Bend brass links and wires away from the element.
5. Remove the element being replaced.

To re-assemble, reverse procedure whilst ensuring that the parts and wires are correctly positioned. Ensure that the new elemetns are marked the same way as the ones that were removed.
Check that the new element is seated correctly in the channels either side and PAT test before use.
Please Note
The Dualit ProHeat elements are covered in a protective heat proof film. Do not remove this film when inserting new elements as this will invalidate the warranty on your toaster.
If you encounter any difficulties while trying to change your Dualit elements give us a call and we'll try and talk you through it.
You'll be back toasting in no time!